Simple Mirror Effect Photoshop

ada banyak cara buat effect bayangan / reflection~
tapi sekarang kita bahas yang simple" az dulu ok

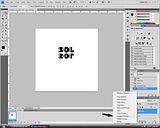
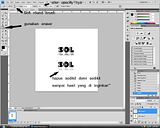
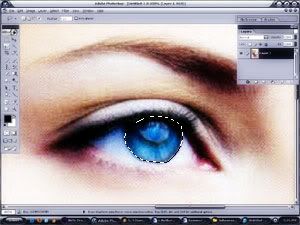
1. kamu membutuh kan sebuah image, saya menggunakan font " SOL "
( save our loli Fans Club Promosi dikit )

2. buat dulpikat nya, dan gunakan free transform dan letakkan dulpikat dengan posisi terbalik dibawah image asli nya..

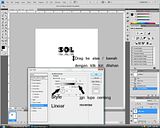
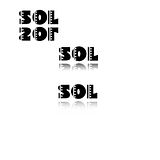
3. Kemudian Gunakan effect Gradiant Overlay, klik tombol FX di pojok kanan:


4. Di layer style gradiant overlay gunakan Style " Linear " dan centang kan opsi reverse, kemudia masi di layer style drag gambar bayangan dari bawah keatas sampah mendapatkan hasil yang di inginkan.


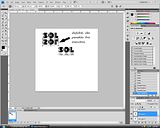
anda bisa bermain" dengan beberapa opsi lain seperti blending mode opacity , scale atau juga gradiant yang berbeda gunakan sesuai selera anda~

dan pencet ok, hasil sudah anda dapatkan...


--------------------------------------------------------------------------------


cara ke 2:

1. Sama seperti cara pertama, anda harus membuat dulpikat gambar dan gunakan free transform untuk membuat effect bayangan dibawah nya:


2. Gunakan Eraser tool, dan pilih brush tipe " Soft round Brush " atau tipe brush lain yang cocok menurut anda, atur opacity nya saya menggunakan 80% opacity ( kreasikan atur sesuai kebutuhan anda )


sapukan eraser anda dibawah bagian image sehingga tercipta effect reflection, sapukan sedikit demi sedikit sehingga tercipta effect yang sesuai anda butuh kan..


sebenernya banyak sekali cara membuat effect pantulan seperti ini, bahkan ada program otomatis nya, tapi menurut saya dengan cara simple seperti ini anda sudah bisa menghasil effect reflection yang bagus..

itu semua tergantung anda sekalian dalam memanipulasi sebuah gambar dengan menambahkan atau mengatur opsi" yang ada..
warna gambar dan background pun mengambil andil yang cukup penting dalam pembuatan sebuah image reflection...

Mewarnai mata Dengan Photoshop

Mewarnai mata

Gunakan Image yang lo suka....
Saia menggunakan Scarlett Johansson.

1.Rename Layer menjadi Base


2. Perbersar / Zoom ( ctr + ) sebanyak mungkin sampai kamu bisa melihat seluruh gambar bola mata di layar monitor mu.


3.Gunakan Lasso ( lasso Tools yg gambar tali lasso itu ) dan Buatlah Pilihan Disekitar bola mata ( lihat gambar biar jelas )


4.Buat Layer Baru dan namakan Dengan nama Colour, Isi layer baru dengan warna yg kamu suka, kalo saia menggunakan Warna #F098B5.


5.Sekarang kamu seharus nya mempunyai 2 layer. Ganti mode layer dari layer kedua menjadi Color ( layer kedua ganti modenya menjadi color kalo ga jelas )


6.Gunakan cara yg sama dengan mata yg lain. Setelah selesai, gabungkan layer mu dan hasil na tadaaa......


7.It's A Sony

Gunakan tutz ini untuk membuat mata Lelouch pada chara lain ( bisa suzumiya haruhi dll ). hanya saja tambahkan 1 lagi layer yg berlambang geass.
( tar g tambahin d untuk sementar ini dulu, tadi stress dah buat tutz panjang eh ga ke hang jadi ga kesave )
kalo ga salah dulu diajarin sama c ivy, Thanks ivy.
kreasikan sendiri dengan gayamu http://www.indowebster.web.id/

Membuat CD Interaktif dengan Macromedia Director III

Setelah membuat desain, animasi, struktur CD dan pendukung lainya, sekarang kita masuk tahap pembuatan aplikasi. Untuk lebih memudahkan dalam pembuatan buatlah satu folder khusus, dimana didalam folder tersebut itu masih terdapat sub-sub folder, buatlah sub folder animasi untuk file yang dibuat dari flash, swift 3D, Swish, 3D studio max, buat sub folder gambar untuk menyimpan gambar dan foto yang diperlukan, buat sub folder musik untuk menyimpan lagu atau instrument pendukung, buat sub folder narasi untuk menyimpan narasai dan seterusnya.

Pertama kita tentukan ukuran movie yang akan dibuat, untuk ukuran standar adalah 800 x 600 pixel (DM Change Resolution adalah xtras yang digunakan agar user bisa memilih resolusi, sehingga bisa melihat cd interaktif dengan berbagai resolusi pilihan). Untuk pembuatannya sendiri silahkan diurutkan sesuai dengan struktur CD yang sudah dibuat. Dimulai dari pembuatan intro kemudian menu utama dan seterusnya.

d

Perlu di ingat juga dalam menempatkan dan memberikan animasi, jangan terlalu banyak memberikan animasi dan tempatkan animasi di lokasi yang tepat. Dan perlu di ingat lagi buatlah aplikasi yang user friendly yang artinya tidak membuat bingung atau user tidak akan bingung dalam menggunakan aplikasi cd interaktif tersebut. Sebagai referensi silahkan melihat cd interaktif yang sudah jadi. Oh ya jangan lupa, sebuah CD interaktif akan terasa kurang hidup tanpa adanya backsound dan narasi. Untuk itu carilah backsound yang sesuai dan buatlah narasi dengan memanfaatkan software cool edit pro atau adobe audition. Masukan backsound dan narasinya setelah semua menu dibuat.

d

Di director sendiri untuk memasukkan sebuah video menjadi lebih mudah dan tidak akan terasa berat (tidak seperti di flash). Banyak juga xtras pendukung untuk video ini, diantaranya adalah Direct Media Xtras.

Setelah pembuatan selesai sekarang adalah proses publishing (membuat file berekstensi exe). Oh ya untuk menghilangkan titlebar saat dibuat projector, aktifkan layer movie kemudian lihat inspector propertiesnya, pilih tab display template kemudian pada titlebar option mastikan fungsi visible. Setelah itu silahkan di atur untuk publishnya, pilih file kemudian publish setting, beri nama project yang dibuat tadi dan atur lokasi penyimpanan. Setelah itu burning dengan menggunakan software burning seperti nero. Perlu diingat juga masukkan folder yang tadi dibuat, dan yang paling penting adalah masukkan semua xtras yang digunakan, video, backsound, narasi dan juga file mentah director. Eh iya…sebelum diburning, buatlah autorun dengan menggunakan notepad, agar ketika cd nanti dimasukkan ke dalam cd rom maka akan langsung tampil.

f

Membuat CD Interaktif dengan Macromedia Director II

untuk membuat sebuah cd interaktif sebaiknya kita mempersiapkan/mencari semua bahan (teks, picture, data, video etc). Dan tak kalah pentingnya adalah membuat struktur dari cd interaktif tersebut. Sebagai contoh lihat gambar dibawah ini :

struktur

Dari gambar diatas akan mempermudahkan kita dalam pembuatan CD ini. Kalaupun pingin ditambahi sub menu yang lainnya lagi juga bisa, karena terkadang pikiran ataupun ide muncul begitu saja. Dengan melihat gambar diatas kita tahu bahwa urutan dari cd tersebut dimulai dari intro kemudian menu utama, menu utama sendiri memiliki beberapa sub menu dan sub menu tersebut juga mempunyai sub menu lagi, yang kesemuanya saling terkait (link).

Setelah membuat struktur cd langkah yang bisa kita lakukan adalah memulai membuat konsep desain antar muka. Bisa dilihat contoh desain antar muka dibawah ini :

1

2

3

Setelah yakin dengan desain yang terpilih selanjutnya mulailah untuk mendesainya (silahkan gunakan software grafis sesuka kamu, mau pake coreldraw, photoshop, illustrator dll terserah ente ajah). Nah pada proses inilah aku dulu sempet dibuat puyeng (kebanyakan referensi, kebanyakan angan-angan dan setumpuk penyakitku mulai menyerang) tapi juga tergantung orangnya koq. :-)) Silahkan berkreasi untuk urusan desain ini (mau pake jurus typhographi, tracing dll terserah ente semua, yang penting enak dipandang mata, nyaman, tidak cepat melelahkan mata kalo dilihat, menarik, sesuai dengan obyek, hati-hati dengan permainan warna, usahakan semua halaman mempunyai keselarasan warna dan mungkin masih ada lagi hal-hal yang perlu diperhatikan dalam urusan desain ini) Pasti semuanya udah pada pinter koq.

Eh iya….jangan lupa untuk membuat animasi (pake flash, 3D max or swift 3D terserah), menyiapkan video (pake software editing pinnacle studio, adobe premiere, ulead video studio atau yang lainnya), backsound (edit pake cool edit pro atau adobe audition). Dan tak kalah pentingnya adalah mencari xtras tambahan (download saja di internet, banyak pihak ketiga yang memberikan xtras secara gratis koq). Dengan xtras inilah yang akan menjadikan director dijamin semakin powerfull bos (hehehehe). Coba cari xtras photo caster, yang akan memudahkan kita karena dengan xtras ini desain yang kita buat di photoshop akan masuk semua ke cast member ataupun ke score secara otomatis dan urut.

Membuat CD Interaktif dengan Macromedia Director

Kebutuhan presentasi visual berkembang dengan sangat cepat. Keadaan ini didukung pula oleh semakin maraknya software-software desain 2D/3D baik yang bersifat easy to use atau virtual reality. Dalam pembuatan presentasi multimedia interaktif director bisa dihandalkan juga karena kemampuan director dalam mengemas informasi dan data dari berbagai software lain untuk digunakan sebagai data pendukung. Director adalah software yang bisa dikatakan powerfull karena kemampuannya untuk berintegrasi dengan software lainnya. Sebuah presentasi ada yang bersifat linier dan non linier. Dan director sangat bisa untuk dihandalkan. Contoh lain dari penggunaan multimedia interaktif adalah company profile, product launching, expose, laporan tahunan, dan masih banyak lagi.


Untuk kali ini kita akan membahas pembuatan CD interaktif yang tentunya menggunakan Macromedia Director sebagai software utama dan didukung oleh software – software grafis dan animasi lainya seperi adobe photoshop, corel draw, 3d animation, macromedia flash, swift 3D, swish, anime fx dan masih banyak lagi. Apalagi ditambah dengan adanya xtras yang semakin membuat director lebih memukau lagi dan juga dukungan bahasa pemrograman lingo sebagai bahasa pemrograman yang digunakan di macromedia director.

Oke untuk sesi yang pertama ini terlebih dahulu akan memperkenalkan macromedia director dan contoh aplikasi yang jadi (tapi cuma screenshotnya saja). Tulisan ini dibuat berdasarkan pengalaman pribadi dalam membuat sebuah CD interaktif, mungkin hasilnya masih jauh dari kata sempurna. Sebagai contoh CD yang dulu dibuat adalah CD interaktif rumah bersalin dan Klinik kesehatan sebuah rumah bersalin di kota karanganyar (jawa tengah). Screenshotnya bisa dilihat dibawah ini :

Pengalaman pertama membuat CD interaktif masih kacau karena belum terkonsep dengan matang, tapi alhamdulilah akhirnya jadi juga. Untuk itu dalam pembuatan CD interaktif sebaiknya kita buat dulu konsepnya, materi (teks, picture, video, voice etc), struktur CD, desain antar muka, tujuan dari pembuatan CD tersebut, sasaran dan fungsi dari pembuatan CD tersebut dan mungkin masih ada lagi hal-hal lainya yang juga perlu disiapkan terlebih dahulu.

Semoga dengan melihat contoh – contoh diatas bisa memberikan gambaran ataupun sebagai referensi dalam pembuatan sebuah CD interaktif. Kreatifitas, kesabaran, keuletan dan tentunya skill dibutuhkan disini (minimal anda sudah pernah belajar photoshop, flash, coreldraw) juga kuat begadang sampai pagi didepan komputer (hehehehe). Finally..untuk sesi perkenalan cukup disini dulu, next session akan membahas tentang langkah awal dalam pembuatan aplikasi berbasis multimedia ini. (semoga bisa cepat kelar nulisnya untuk sesi-sesi berikutnya).

dikutip dari: http://faisalman.wordpress.com

Instalasi Mikrotik Router OS Versi 2.9

Mikrotik dapat digunakan dalam 2 tipe, yaitu dalam bentuk perangkat keras dan perangkat lunak. Dalam bentuk perangkat keras, Mikrotik biasanya sudah diinstalasi pada suatu board tertentu, sedangkan dalam bentuk perangkat lunak, Mikrotik merupakan satu distro Linux yang memang dikhususkan untuk fungsi router. Mikrotik routerOS adalah sistem operasi dan perangkat lunak yang dapat digunakan untuk menjadikan komputer biasa menjadi router network yang handal,mencakup berbagai fitur yang dibuat untuk ip network dan jaringan wireless.
Fitur-fitur tersebut diantaranya : Firewall & Nat, Routing, Hotspot, Point to Point Tunneling Protocol, DNS server, DHCP server, Hotspot, dan masih banyak lagi fitur lainnya.
Komputer yang akan digunakan sebagai router network cukup dengan spesifikasi menengah, di tempat saya bekerja, Mikrotik dipergunakan pada cpu Pentium III 800 Mhz, RAM 512 mb dan hdd 10 Gb sebagai firewall dan hotspot server untuk melayani sekitar 150 user.
Berikut ini adalah step-step instalasi Mikrotik routerOS

Sebelumnya persiapkan dulu cd instalasi miktorik, kalau belum punya ya silahkan cari pinjaman atau download dulu file ISO mikrotik di sini. Setelah cd siap maka masukkan ke cdrom dan lakukan boot from cd.
pastikan komputer yang akan dipergunakan memiliki minimal satu ethernet card.
Setelah proses booting selesai maka akan muncul tampilan berikut (klik untuk gambar yang lebih jelas):
mikrotik Tampilan diatas adalah pilihan paket-paket yang akan di install, tekan ‘a’ untuk menginstall semuanya dan diteruskan dengan menekan ‘I’ untuk melanjutkan proses instalasi.
Proses instalasi dilanjutkan dengan pembuatan partisi dan format harddisk, harap diingat bahwa mikrotik akan mengambil semua space yang ada di harddisk. karena itu tidak disarankan utk menginstall mikrotik pada harddisk operasional yang berisi data-data penting seperti mp3 atau mungkin file avi kesayangan anda. (lho kok data operasional penting mp3 dan avi .. jangan jangan :-D )
Setelah melakukan pembuatan partisi dan memformat harddisk maka tahap terakhir adalah menginstall paket-paket yang dipilih pada awal tadi ke dalam harddisk. setelah selesai tekan enter untuk reboot.
Mikrotik yang baru saja di download dan di install adalah versi shareware yang hanya bisa dipergunakan sementara dan akan bisa dipergunakan lebih lanjut bila melakukan registrasi terlebih dahulu, tapi jangan khawatir, versi ini sudah cukup untuk dipakai belajar kok.

Mikrotik telah selesai di install, dan bisa dipergunakan dengan login sebagai user admin dan tanpa password. Selanjutnya adalah setting network, sebagai contoh mikrotik akan diberi alamat ip 192.168.202.1 dengan netmask 255.255.255.0.
Untuk itu ketikkan pada console perintah berikut


/ip address add address=192.168.202.1 broadcast=192.168.202.255 network=192.168.202.0 netmask=255.255.255.0 interface=ether1
Nah sekarang mikrotik sudah bisa diremote baik dengan telnet maupun dengan Winbox. Winbox adalah sebuah utility untuk melakukan remote ke server mikrotik kita dalam mode GUI.
Untuk mendapatkan winbox, buka browser dan arahkan ke http://192.168.202.1/winbox/winbox.exe
Berikut ini screenshot dari winbox tersebut

Demikian step-step instalasi mikrotik yang bisa saya sampaikan, selanjutnya Insya Alloh di kesempatan lain akan saya lanjutkan dengan konfigurasi fitur-fitur mikrotik lainnya.

Tutorial Instalasi PCLinuxOS MiniMe ke USB Flash Disk

Biasanya untuk distro Linux versi live CD, bisa anda jalankan langsung melalui CD-ROM tanpa harus diinstall ke komputer, nach sekarang bagaimana jika anda ingin menjalankan Distro Linux Live-CD melalui USB Flashdisk anda? caranya sangat mudah sekali, karena tadi siang saya baru saja mencobanya, adapun tutorial cara instalasinya, saya sederhanakan bahasanya dengan menterjemahkan dari tutorial versi Bahasa inggris yang saya kutip dari situs PendriveLinux, supaya mudah dimengerti bagi anda yang ingin mencoba menjalankan Linux melalui USB Flashdisk. Adapun untuk Distro linuxnya menggunakan PCLinuxOS MiniMe yang merupakan Distro PCLinuxOS yang diturunkan dari Mandrake yang sekarang berubah nama menjadi Mandriva.


Baiklah kita mulai tutorialnya, namun sebelumnya anda persiapkan terlebih dahulu keperluan dasar untuk instalasi :

Cara instalasi PCLinuxOS ke USB Flash Disk di Windows:

  1. Silahkan anda download semua keperluan dasarnya yaitu HP-USB Format Tool, ISO PCLinuxOS MiniME dan FixMM.Zip
  2. Install HP-USB Format Tool, kemudian format USB Flash Disk anda menggunakan system Fat atau Fat32.
  3. Buat Folder Baru di komputer, kemudian ekstrak fixmm.zip kedalam folder yang baru anda buat, dan jangan lupa untuk file ISO PCLinuxOS Minime yang telah didownload, anda tempatkan juga ke folder baru tersebut disatukan dengan hasil ekstrak-an fixmm.zip
  4. Jalankan file fixmm.bat yang berada pada folder baru tersebut, baca instruksinya, kemudian tekan [Enter], sehingga akan dihasilkan folder baru dengan nama MiniMe yang berisi file system PCLinuxOS.
  5. Kopikan seluruh isi file yang berada pada folder MiniME, ke USB Flash Disk anda.
  6. Jalankan file Makeboot.bat dari USB Flash Disk anda, untuk menjadikan USB flashdisk anda menjadi Bootable.
  7. Selesai untuk proses instalasi PCLinuxOS Minime ke USB Flashdisk anda. Untuk menjalankannya silahkan anda setting BIOS terlebih dahulu aga bisa boot melalui USB Flash Disk.

Catatan : Setelah muncul form login anda bisa gunakan username: root dan password: root atau username : guest dan password: guest

Pengantar Menejemen Bandwidth dengan ALTQ IV

Pada session terakhir ini pada seri pengantar menejemen bandwidth dengan ALTQ, saya akan sedikit membahas tentang passing pada altq untuk kasus-kasus tertentu.coba lihat rule altq di bawah ini.
altq on $int_if bandwidth 10M hfsc queue {ddef, dsatu, ddua, dtiga
queue ddef bandwidth 512Kbqueue dsatu bandwidth 1Mb
queue ddua bandwidth 128Kb
queue dtiga bandwidth 256Kb

pass out quick on $int_if inet from any to 192.168.1.0/24 queue dsatu
pass out queue on $int_if inet from any to 192.168.2.0/24 queue dsatu
pass out quick on $int_if inet from any to 192.168.3.0/24 queue dsatu
pass out quick on $int_if inet from any to { 192.168.4.1, 192.168.5.1 } queue ddua

dari rule diatas dapat di artikan sebagai berikut:
1. Bahwa rule altq dengan id dsatu di gunakan untuk banyak rule passing, yang artinya network _ 192.168.1.0/24, 192.168.2.0/24 dan 192.168.3.0/24 akan mempunyai bandwidth masing-__masing sebesar 1Mb, satu network dengan network tidak saling berhubungan dan __tergantung.
2. Untuk rule altq dengan id ddua digunakan untuk passing ip 192.168.4.1 dan 192.168.5.1 yang __artinya bandwidth share.

tapi dalam menentukan kebijakan menejemen bandwidth yang perlu di perhatikan adalah :
1. Pelajari dasar kebutuhan nertwork yang kita milik
2. Cari pendekatan yang akan kita gunakan, pendekatan tersebut meliputi : dari ip mana dan ke _ ip mana, protokol apa yang akan di shape, interface mana yang akan di shape dan service apa _ yang akan di shape.
3. Karena dengan mengetahui dua permasalahan diatas maka, administrator akan lebih mudah __dalam membuat rule ALTQ.

Pengantar Manajemen Bandwidth dengan ALTQ III

Seperti yang telah saya sampaikan bahwa penulisan rule pf haruslah urut sesuai dengan aturannya dan tidak bisa di bolak-balik. adapun urutannya adalah sebagai berikut: variable, table, options, ALTQ, translating, forwarding, blocking dan passing. lalu apa hubungannya dengan posting kali ini?. bahasan kali ini adalah tentang rule passing untuk ALTQ dengan kasus yang spesial. karena rule passing juga tidak bisa di bolak-balik.misalkan seorang administrator mempunyai kebijakan rule firewall sebagai berikut :
1.bandwidth network 10.10.1.0/24 ke internet sebesar 128Kb
2.bandwidth network 10.10.1.0/24 ke 192.168.1.0/24 sebesar 1Mb
3.bandwidth network 10.10.2.0/24 sebesar 256Kb
4.bandwidth network 10.10.3.0/24 sebesar 512Kb
5.bandwidth link antar network 10.10.0.0/16 sebesar 10Mb
6.bandwidth network 10.10.0.0/16 protocol icmp sebesar 128Kb
7.bandwidth network 10.10.0.0/16 protocol tcp dan udp port 52 sebesar 128Kb
8.bandwidth network 10.10.0.0/16 protocol tcp dan udp port 161 sebesar 128Kb

Dalam penyusunan rule passing untuk kasus di atas adalah sebagai berikut :
1.passing aturan nomor 6
2.passing aturan nomor 7
3.passing aturan nomor 8
4.passing aturan nomor 5
5.passing aturan nomor 2
6.passing aturan nomor 1
7.passing aturan nomor 3
8.passing aturan nomor 4

misalkan aturan di atas tidak di penuhi, lalu apa yang terjadi ?
1.ketika local link antar network 10.10.0.0/16 penuh, ping time akan naik
2.link network 10.10.1.0/24 ke 192.168.1.0/24 yang sebesar 1Mb akan menjadi 128Kb
3.permintaan port 161 klien akan time out karena bandwidth local link antar network _10.10.0.0/16 penuh
4.masih banyak lagi tergantung kesalahan penempatan rules.

Pengantar Manajemen Bandwidth dengan ALTQ II

Salah satu usaha yang kadang di perlukan dalam manajemen bandwidth adalah men-bypass bandwidth antar local network walaupun berbeda subnet. misalkan, local network tersebut mempunyai subnet 10.10.1.0/30, 10.10.1.4/30, 10.10.1.8/30 dan 10.10.1.12/30.
Pada dasarnya secara default tiap-tipa subnet diatas akan terlimit, karena masing-masing mempunyai broadcast yang berbeda. lalu bagaimana jika ingin men-bypass bandwidth antar subnet-subnet yang di inginkan ?

pada awalnya saya mengira bahwa untuk men-bypass bandwidth dengan ALTQ saya bisa menggunakan script table pada pf. tapi ternyata dugaan saya salah.semula saya mengira dengan script seperti ini :
table local { 0.0.0.0/0, !10.10.1.0/24 }

altq on $ext_if bandwidth 2Mb hfsc queue {udef, usatu, udua, tiga, empat }
queue udef bandwidth 8Kb hfsc (default realtime 8Kb)
queue usatu bandwidth 128Kb hfsc (realtime 128Kb)
altq on $int_if bandwidth 2Mb hfsc queue {ddef, dsatu, ddua, dtiga, dempat }
queue ddef bandwidth 8Kb hfsc (default realtime 8Kb)
queue dsatu bandwidth 128Kb hfsc (realtime 128Kb)
pass out quick on $ext_if from 10.10.1.0/30 to local queue usatu
pass out quick on $int_if from local to 10.10.1.0/30 queue dsatu

dengan rule seperti diatas ternyata salah besar, dan network 10.10.1.0/30 akan terlimit walaupun ke network 10.10.1.0/24 atau ke subnet yang lain. mengapa ?

karena defaultnya rule altq dengan pf adalah deny. artinya walaupun untuk local network harus di definisikan berapa besar bandwidth yang harus di sediakan. karena dengan rule seperti diatas maka akan berarti dari nerwork 10.10.1.0/30 ke 10.10.1.0/24 tidak dilimit. ini sangat melanggar aturan dasar ALTQ. lalu apa keuntungannya ? jelas dengan rule default deny (mendifinisikan bandwidth local network) akan sangat membantu bila link antar subnet throughput-nya "terbatas". misalkan link antar BTS yang menggunakan media wireless.

Table akan sangat ampuh untuk di gunakan untuk blocking, seperti yang banyak saya gunakan untuk membuat inclusive firewall. misalkan.
table local { 0.0.0.0/0, !10.10.1.0/24 }
block in quick on $int_if proto icmp from local to any
lalu bagaimana men-bypass bandwidth ?
letakkan rule passing local network pada baris paling atas.

Instalasi Windows XP Melalui USB Flash Disk

Salah satu masalah yang timbul akibat ketidaktersediaan optical drive/CD-ROM/CD-RW pada subnotebook/PC adalah kesulitan saat hendak melakukan instalasi aplikasi ataupun sistem operasi. Tak jarang pengguna harus menyalin aplikasi atau sistem operasi yang hendak di-install ke dalam USB flash disk, atau mencolok external optical drive dan melakukan instalasi seperti biasa. Namun, tentu saja hal ini sangat merepotkan, mengingat tak banyak pengguna awam yang mengetahui prosedur instalasi aplikasi atau sistem operasi via flash disk, dan harga sebuah external optical drive yang tidak murah.

Contoh kasus, andaikan kita hendak mengganti sistem operasi Xandros Linux yang terpasang di subnotebook Asus Eee PC dengan Windows XP, maka kita harus menginstal via external optical drive. Mungkin tak terlalu memusingkan bagi Anda yang punya cukup dana untuk membeli sebuah external optical drive, namun bagaimana dengan Anda yang sejak awal ingin berhemat dengan membeli subnotebook?

Nah, lewat artikel ini penulis ingin berbagi tips membuat modul instalasi Windows XP menggunakan media USB flash disk, yang tentunya akan menghemat biaya dan menjadikan pembaca lebih pintar. Modul instalasi ini tak hanya dapat diimplementasikan dalam instalasi ke subnotebook saja, tapi juga dapat diaplikasikan pada komputer mana pun yang sudah memiliki fitur untuk booting via USB.

“Gampang! Tinggal salin file instalasi Windows XP ke flash disk!” Mungkin itu yang terlintas di benak Anda, tapi percayalah bahwa membuat modul instalasi Windows XP tidak semudah itu. Namun jangan khawatir, karena dengan mengikuti langkah-langkah berikut, proses pembuatan modul instalasi Windows XP pun tak terlalu sulit dilakukan.

Peralatan Yang Harus Disiapkan:

  1. Sebuah komputer yang dilengkapi optical drive (CD atau DVD) dan port USB yang dapat bekerja dengan baik.
  2. Sebuah USB flash disk berkapasitas 1 atau 2 GB.
  3. CD instalasi Windows XP.
  4. Aplikasi pembuat modul instalasi (USB_PREP8 dan PEtoUSB) yang dapat diunduh cuma-cuma melalui link http://www.sendspace.com/file/7n781n

Langkah-langkah Pembuatan:

  1. Tancapkan USB flash disk ke salah satu port USB. Ingat-ingat posisi drive-nya. Apakah F:, G:, H:, dan sebagainya.
  2. Saat Anda berada di posisi normal (desktop), masukkan CD instalasi Windows XP ke optical drive. Jika komputer menjalankan proses instalasi secara otomatis, batalkan saja dan tutup semua aplikasi yang tengah berjalan.
  3. Unduh dan ekstrak aplikasi yang penulis berikan. Saran penulis, ekstrak seluruh isinya ke sebuah folder, semisal C:\USB.
  4. Selanjutnya, buka folder di mana Anda mengekstrak aplikasi modul pembuat instalasi, kali ini kita ambil contoh C:\USB.
  5. Jalankan file bernama “usb_prep8.bat” maka di layar monitor akan tampak jendela Command Prompt berisi macam-macam perintah. Jika sudah muncul tulisan “Press any key to continue,” tekan sembarang tombol untuk konfirmasi.
  6. Di layar akan muncul jendela PEtoUSB yang meminta Anda memformat USB flash disk Anda. Tak perlu mengubah setting apa pun, langsung klik Start untuk mulai proses format. Jawab konfirmasi sesuai kebutuhan Anda.
  7. Jika sudah selesai, tutup jendela PEtoUSB (jangan menutup jendela Command Prompt yang tadi terbuka ketika Anda menjalankan usb_prep8.bat), maka di layar akan muncul opsi-opsi dari 0 hingga 5.
  8. Gunakan opsi 1 untuk memilih sumber file instalasi yang nantinya akan disalin ke flash disk. Disini, tentukan di drive mana Anda menyimpan instalasi Windows XP. Pilih saja optical drive di mana sudah ada CD Windows XP di dalamnya, atau pilih folder pilihan Anda jika Anda telah menyalin file instalasi Windows XP ke folder tertentu.
  9. Pilih opsi 3 untuk menentukan di mana Anda mencolok flash disk. Kalau flash disk Anda berada di drive F:, maka ketik F dan tekan ENTER. Jika drive G: maka ketik G dan tekan ENTER, begitu seterusnya berlaku untuk drive lain.
  10. Selanjutnya pilih opsi 4 untuk mulai proses pembuatan modul instalasi yang nantinya akan disalin ke flash disk secara otomatis. Jawab apa pun konfirmasi yang muncul dengan Y atau YES atau OK atau bentuk persetujuan lain.

Selesai! Kini flash disk Anda telah siap digunakan untuk instalasi Windows XP! Silahkan melakukan setting pada BIOS subnotebook Anda, dan pilih Removeable Disk (atau apa pun nama lainnya) sebagai media pertama yang dijalankan saat booting.

Mengingat teknik instalasi semacam ini juga tersedia di internet, Anda juga bisa mencarinya via mesin cari. Selamat mencoba…!

Pengantar Menejemen Bandwidth dengan ALTQ

Dalam sebuah menejemen bandwidth ada 2 Prinsip yang menjadi dasar.
Pertama adalah bagaimana memaksimalkan penggunaan bandwidth yang dimiliki, misalkan mempunyai bandwidth 128Kbit, maka bagaimana dengan bandwidth 128Kb dapat digunakan secara maksimal dengan penggunaan banyak user maupun beberapa user, siang hari atau malam hari. dalam hal ini biasa digunakan pada sisi client misalkan kampus, warnet, MPG, corporate atau pelanggan rumah.
Kedua adalah bagaimana memberikan jaminan bandwidth yang sesuai dengan yang ditetapkan. misalkan bandwidth 128Kbit maka harus benar-benar 128Kbit boleh lebih tapi tidak boleh kurang, atau yang disebut dengan QoS (Quality of Service). dalam hal ini banyak di terapkan oleh provider.
Dalam menejemen bandwidth seperti kebutuhan di atas, ada beberapa teknik yang bisa di terapkan diantaranya adalah :
ALTQ (Alternate Queueing) dan CBQ (Class Base Queue) dengan cara seperti ini akan sangat cocok bila di terapkan pada sisi client, dimana client mempunya beberapa network/service yang masing-masing network/service mempunyai garansi bandwidth tapi memungkinkan untuk meminjam bandwidth network/service lain bila bandwidth network/service tersebut tidak terpakai atau idle.
ALTQ (Alternate Queueing) dan HFSC (Hierarchical Fair Service Curve) dengan cara seperti sebuah network/service akan di garansi dengan sebuah bandwidth dengan mendifinisikan realtime dan option lainnya seperti upperlimit dan linkshare. HFSC akan sangat cocok di terapkan pada sebuah provider agar menjamin bandwidth yang mengalir ke client benar-benar sesuai dengan besarnya bandwidth pelanggan.
disamping kedua teknik di atas dapat ditambah kan options-options sebagai berikut:
RED (Random Early Detection), RIO (RED In Out), dan PRIQ (Prioritas). Prioritas akan mempunyai nilai 1-7 dimana 1 adalah prioritas terbesar. dengan opsi PRIQ seorang admin dapat dengan mudah mendahulukan sebuah network/service untuk memperoleh bandwidth.
ada beberapa hal yang harus di perhatikan jika menggunakan ALTQ:
  1. PF dan ALTQ sudah terintegrasi dengan kernel FreeBSD 5.3 ke atas, untuk shapping masing-masing versi FreeBSD mempunyai sedikit perbedaan script, tapi untuk logging, blocking, forwarding, translating dan passing relatif sama.
  2. Interface yang hadap internet dianggap upstream dan interface yang hadap client dianggap downstream (FreeBSD 5.x) pada FreeBSD 6.x dan FreeBSD 7.x ada sedikit perbedaan.
  3. Beri options quick.
  4. Mesin limiter harus fungsi routing bukan translating.
  5. Beri nilai default minimal, 8Kbit
  6. Mendifinisikan variable akan lebih memudahkan editing dan perubahan struktur scripts.
  7. Urutan file pf adalah variable, options, ALTQ, Translating, Forwarding, Blocking dan Passing. (tidak boleh terbalik)
  8. Beri queue limit lebih panjang, default bernilai 50
  9. Agar memudahkan editing, penulisan script dibuat grouping atau bertingkat.
  10. Gunakan Interface yang mempunyai buffer yang besar seperti Intel (fxp).
  11. Atau menambah buffer interface dengan merubah nilai default buffer sebuah interface, (sysctl -w kern.ipc.maxsockbuf=(integer).
  12. Cek scripts sebelum loading file (pfctl -nf /etc/pf.conf)
  13. jangan lupa "dipantau".

Install Windows from USB FlashDisk

This idea began when you want to install Windows on the notebook. Because the notebook does not have a CD-ROM, InfoKomputer must use an external CD-ROM. Then thought, what if the installation process using a flash? Solution is clearly more practical and inexpensive, because we do not have to buy an external CD-ROM, and only use the USB flash disk that are affordable.

However, to do this, we can not just put the files from the Windows installer CD to flash disk. We have to make is known as flash bootdisk first. One thing that the BIOS is also crucial in the notebook / netbook / PC we will install should support booting through the flash disk. In fact nearly all the new products already support it, but we suggest you check the BIOS of your PC first.

If you can, the following is a list of completeness you need.
1. A PC with a CD-ROM (for the process of preparation and file transfer)
2. Windows XP installer CD or Vista
3. Application support form (available in three DVD editions InfoKomputer February):
a. USB_PREP8
b. PeToUSB
c. Bootsect.exe
4. Flash disk with a capacity of at least 1GB

Here's how to enter in to the Windows installer flash disk.

1. PeToUSB.exe to copy the files in the folder USB_prep8.
2. Run the file usb_prep8.cmd with the double click. The file is located in the folder USB_Prep8. Note: If your PC using Windows XP2, you need to unblock the file to be run. How, right-click> Properties> Unblock
3. Later file a window will appear like the picture below.
4. Press Enter, and a window will appear.
5. Leave all the settings in the default (unless you want to change the drive label) and press Start. This akan menformat your flash disk, so make sure no important files on the flash disk.
6. Once the process is completed, DO NOT close the window PeToUSB. Leave it open.
7. Open the command prompt (caranye click Start> Run> cmd). At the command prompt panel, go to the folder where the file is saved bootsect.exe. Way, type "cd namafolder". For example, because bootsect.exe files in the folder bootsect located on the desktop, we type "cd desktop" and then "cd bootsect" (both without quotes).
8. If bootsect.exe already met, type "bootsect.exe / nt52 X:" (without quotation marks). Note: X: drive to show your flash disk, so first find out the name of the drive. On our case, the name of L so that the drive is the command to "bootsect.exe / nt52 L:"
9. If step 9 is done correctly, a message will appear "Bootcode was successfully updated on all Targeted volumes." Close the window and command window PeToUSB. note: do not close the window USB_Prep8. USB_Prep8 window should remain open.
10. When you close the window PeToUSB, USB_Prep8 in the window will automatically appear as menu options under the picture. If not, try and press Enter.
11. At this stage, you actually just do the settings for Prep8, free way is to select the menu based on the number. You must change are:
a. Menu 1: select the drive where Windows XP (or your CD-ROM). I click on 1, will be out later Explorer to select the drive. Select the name of the drive (the PC is C).
b. Menu 2: Virtual TempDrive choose, or a virtual drive in your PC hard drive as a place to store data (before moved to the flash disk). Select the drive that is not in your PC, eg drive T.
c. Menu 3: to choose your flash disk drive. Press 3 and select the flash disk drive that you want to enter Windows.
d. Menu 4: the menu to run the next process. If you have run the 1 to 3, you immediately run this menu 4.
12. Nanti akan pop-up window that will immediately delete the temporary drive (which we do in the menu 2). Press Yes.
13. After that, the file transfer process to run the Windows installer. There are two processes going on in here. First transfer files from a CD-ROM to hard disk, and the second from the hard disk to flash. The length depends on the speed CD-ROM or flash, and in our case about 30 minutes.
14. After that, we live Plug flash disk to the PC we will install, and set the booting priority to the flash disk. When switched on, there are two options available. Select option number 1 (TXT Mode Setup Windows XP).

After that, the installation process is running as normal, including the process re-booting. No you need to do here, just wait until the installation process is complete. To note is the flash disk can not be revoked until the process is complete (already signed in Windows).

Well, now the Windows installation can be done even though you do not have a CD-ROM. very practical!

Re-install the Operating System With Fast

Re-install the operating system might often be done by many computer users. When the computer it is already "lemot" because of the many things that are not important, can be re-install it.

Installing the operating system does not take a moment. waiting time of 30 minutes - 1 hour. The length depends on the installation of hardware (read: processors, memory, and disk) that is used.

Actually reinstall the operating system does not always have to run so long. Do with the cloning of the disk, we need not be through a lengthy installation process. ita just need to copy the results of cloning and the PC is operating bersistem again. So that the results of cloning as an operating system that is still fresh, do cloning shortly after you finish to install the operating system and drivers. Other programs should not be installed.

The core of the hard disk cloning is copying the entire hard drive contents to other media - to be another hard disk, CD, DVD, or external hard drive. With cloning, you will get the contents of the CD-R with the exact content of hard disks.

We need to do some parangkat cloning. First is the software for cloning. One is that you can use Norton Ghost from Symantec. We also need a CD-writer, CD start-up, and 2 floppy diskette 1, 44 MB.

Save to CD
Since we will be doing the cloning of the operating system, the drive that contains the operating system that will dikloning - usually drive C. But, I can only operating system on another drive, for example, because there is more than one operating system in a PC.

On this tutorial, do pcplus want cloning of the C drive that contains the Windows operating system with the size of the partition of 400 MB.

let's start.
  1. Run Norton Ghost by clicking the [Start]> [Program]> [Norton Ghost] [Norton Ghost].
  2. You will see the view Ghost Basic. Select the first option, the [Backup].
  3. Click [Next].
  4. Select the Source option in the select drive C. Destination in the options select [Recordable CD or DVD]. After that, click [Next]> [OK].
  5. Press the [Next], [Next] again, [Next] again. Then click [Continue], click [Run Now], and finally click [OK].
Windows will restart and Norton Ghost to do any back-up. Now you have 1 CD that is the image of your C drive. The contents of the CD is only 1 file that berekstensi GHO. You can not see the contents of the file without assistance Ghost Explorer. With the help of Ghost explorer, you can view the files on the file in the GHO.

I Start-up Disk
We need a floppy start-up results so that the GHO image file can be used when we want to "re-install" the operating system. Start-up disk is a two 1.44 MB floppy diskette. We call the first diskette "floppy A", while the second disk we call the "floppy B".

Run Norton Ghost and click [Ghost Utilities]> [Norton Ghost boot wizard] [CD / DVD startup disk with ghost] [Next]> [Use PC-DOS] [Next] [Next] [Next]> [Next]> [OK]. Insert blank floppy disks to make CD / DVD start-up. Press [Start] to make a format disk, then press [Close].

Next will be a floppy start-up disk. When the confirmation to enter the second disk appears, remove and insert a floppy diskette B. Press [Start] to do the format and press [Close]. Wait until the process is finished, and press [Finish] to end.

Now you have a startup floppy disk 2. This diskette that will be used for booting the first time. Note that the second disk is related to one another. A diskette can not be run without the disk B, so is vice versa. B diskette can not be run without the floppy A.

"Install"
Why install it be in quotes? That's because we do not install the operating system. But, just copy the operating system that we installed previously.

Step by step this is done when we want to re-invigorate the operating system. We are doing is cloning from CD to hard disk.

In the BIOS, so that the Set is made from boot floppy diskette. Insert a floppy in the floppy drive. Follow the instructions on the monitor, if you are inserting floppy B, then enter the diskette B. You are prompted to insert a floppy and press return [Enter], and the last return you are required to enter the disk B.
Now you have entered a Norton Ghost.

To perform cloning from a CD to the hard drive, select [Local]> [Partition]> [from image]. Navigate to the CD-ROM containing the GHO file, and press [Open]. In the "Select source partition from image file", click [OK]. Then in the "Select local destination drive by clicking on the drive number", click [OK]. Select the drive that will be in the cloning, select drive C, press [OK] and press [Yes].

Cloning will run until reaching 100 percent. Press [Reset computer] to restart. Remove the diskette from the floppy drive and the BIOS Arrange to take your first booting from the hard disk.

Make your PC / Computer Fast

Sometimes the pc both with windows xp and vista to be slow even very slow. This can be due to many of them because the virus, often go out the program or install and uninstall, spyware, error due to change any settings correctly, and so, well at this time if you include the one that felt the symptoms above, the computer is very slow and even slower so at this time there is free software that can make a pliers PC / computer that is faster Advanced WindowsCare is the program to track the error on the PC at the same time improve it so that the result will make a faster PC / your computer, Advanced WindowsCare has several advantages, including:

* Free is a freeware or
* Includes spyware scanning
* Fix the registry error
* System Optimization in the windows
* Control and Optimize Windows startup
* Eliminate waste files
* Scan the system can be done quickly

And many more advantages, so too bad if we do not take advantage of this free software facilities

Media Download the Linux Indonesia version

As a romp in the IT world, eh draw science are meant in the information technology environment, it is necessary to know more about linux operating system. Operating system that I try to use 3 years ago, within a period of 3 months and did not survive long because of the limited ability of difficulty and still get a tutorial on the specifics linux.

With the slogan that once out of the Depkominfo that are a indonesia Indonesia Go Open Source or better known by the name of IGOS, it seems as IT students need to know a little more about this operating system. In addition also, also appeared to have been a lot of companies in Indonesia that use Linux in the environment their company, particularly in the field of management Network access the Internet because Linux is reliable in terms of network configuration.

With the reason that I have to learn a little about this operating system so I need to download the OS itself is using the internet access at home is not unlimited because you want to remove the money to buy the chip DVD sold an average of Rp. 25000. takes 50 hours to download a file size of 4.3 GB with speed average download 25Kbps.

For what you want to download it please go to this address for the installation of Mandriva Linux 2009 Beta 1, and to address this installation to get the Open Suse Linux 11.1 to this address or to get a variety of variations of Linux and Open Suse to learn early media friends to know close to linuk can www.opensuse.or.id with indonesia language tutorial and equipped with a series of events that often do by the openSUSE community .. I hope this article useful .

Changing Pirated Windows XP Windows Being Genuine (original)

Perhaps the most windows XP users in India using pirated Windows XP. But it does not mean pirated Windows XP is not genuine (GENUINE).

Distinguish the original Windows XP or not in fact located on the serial number that is used when the process of installing Windows XP.

To test whether our original windows XP, try using the tool "Microsoft Genuine Advantage Diagnostic Tool", which can mendetaksi authenticity of your Windows XP, for example, I use windows but use pirated serial number is so genuine, the tool "Microsoft Genuine Advantage Diagnostic Tool" when you windows xp that a cave is Original, this evidence:

Download logitcheck here

This process can run to 10 minutes depending on connection internya. if there are in the process of validation is not passed or the original windows do not usually have to pay the $ 149 price 1jutaan about it, so this time I change the Windows Genuine become authentic, and not to be charged $ 149 for the purchase of microsoft by serial number.

If it turns out the windows XP that we use is not genuine, so I need to worry. I can have windows Xp serial number which is evidently genuine: Please download here.

But our problem is what lazy to re-windows, use the application made Jelly Bean Keyfinder can change the serial number for windows Xp, so I need to hard re-install windows so we. Download Keyfinder here

Click Options, then enter Key its validation then restart your computer.

This article does not guarantee you a free Windows Secrets from the general public may look like lisesnsi every secret but the views not only windowsnya only. But the sticker on your PC / Laptop does not match with that found in the Software. So please do not pass can lunge secret pirated windows.

Once completed please ceck its validation with logitceck. result like this:


Please try, hopefully this article can be useful for you.

How to Get $ 100 from Adsense In 60 seconds


If I'm not wrong, get $ 100 dollars from adsense is a dream for every Blogger. Did you know that there is a very easy to get $ 100 from adsense in one day. You can even do it in just 60 seconds.

Below is a trick how to get $ 100 from Adsense in just 60 seconds. I give this trick only for you for free.

First, login to your adsense account.
After login, you will be automatically taken to the page for this day.

Second, the Save page.
If you use Mozilla Firefox, click ctrl + s to save the page. (Because I use Mozilla Firefox).

This is a screen shot of the adsense earnings for a single day without doing tricks. Very small is not it?
Adsense Earnings I this day without tricks

Then, open a page that has been previously saved using Notepad or other text editor.
Changes in the revenue section. example on my page, I will change the number $ 0.47, $ 0.44 and $ 0.03. Remember, change the number depending on the number listed on your page
Open with Notepad or another text editor
To simplify, you can use the search tool. Then edit the number you want. Change it to $ 100
.
It use the search tool
After you edit all the numbers, and then save it.
Edited the page with your browser.
And then, woow! adsense your earnings is now $ 100 and be done in just 60 seconds.

My AdSense earnings in just 60 seconds

An easy way is not it?


He2 only trick is false.

This article is for you please let me is easilly do not trust the products that sell for how to improve your Adsense earnings. Outside there are many products that promise that you can increase your Adsense income in just one day or one week. They will give you a screenshot of their earnings with Adsense Adsense amazing.

Do you Believe that screenshoot? I'm not. Maybe they shot the screen is edited the same page by using the tricks that I tell you before.
So be careful in selecting products. carefully before buying.
I hope this article can be useful for you
sumber:
-->http://www.patromax.com/


Tips Download cepat via ziddu

  1. Saat mendownload file, pastikan anda dalam keadaan login di ziddu, untuk itu anda harus melakukan registrasi dulu di ziddu. untuk melakukan registrasi di Ziddu.com anda bisa REGISTER SECARA GRATIS anda bisa membuka http://www.ziddu.com atau KLIK DISINI
  2. Setelah anda REGISTER SECARA GRATIS, silahkan anda login.
  3. Pastikan pada saat mendownload file anda dalam keadaan login, dengan begitu proses download akan menjadi lebih cepat dan stabil.
  4. Untuk mengindari terputusnya proses download, lebih baik download file satu per satu, usahakan anda mendownload pakai IDM, kalo belum punya IDM ful version download DISINI untuk IDM Full biar lebih nyaman

Also finally Changed Page Rank On my Blog

After several months, I install the source code from the Page Rank prcrecker.info eventually also useful. I almost disappointed with the picture above is about me, I of the month-aja kebulan same picture, there is a change at all, I had akan many to delete them, hmm. After the return from the search for food and ngopi in Angkringan sahabat2ku same, I descend to the cafe and how much happiness my heart, the first picture I have empty the green color of the numbers 0, no change to the green and numbered 1, the question "whether the image of PR I This can be changed? "finally has been missed, although I 1 I give thanks that what I want can be achieved eventually as well, and hopefully can be a PR-2-3-4 and so on, it seems the search engine optimization that I do have end - This also causes an increase page rank of my blog! Although I do not buy text links from the top search engine ranking website with high ranking, and exchanging links with similar situs-situs/blog PageRank. In addition, I link popularity while ranking shoutmix increased traffic seems stable. I successfully improve the page rank after learning about search engine ranking, keywords, seo tools and reciprocal link exchange.

Increasing PageRank one unit may not look like anything, but in the ranking of search engines is very affecting. PageRank algorithm is the most received ratings in the world and almost all the pages based on that.

Article "A result of such a search" f4qih "between all the other pages on the World Wide Web about how important a page. A hyperlink to a page counts as a vote support. The PageRank of a page is defined recursively and depends on the number and PageRank metric of all pages that have references to it ( "incoming links"). The page linked by many pages with high PageRank receives a high rank itself. If there is no link to the web page does not have support for that page.

Google gives a numeric weighting from 0-10 for each web page on the Internet; this PageRank denotes a site's importance in the eyes of Google. PageRank is derived from the theoretical possibility of logarithmic values on the scale as the Richter scale. PageRank of a particular page is roughly based on the number of inbound links and PageRank of the page provides a link. Note that other factors, e.g. the relevance of search words on the page and actual visits to the page reported by the Google toolbar also influence the PageRank. To prevent manipulation, spoofing and spamdexing, Google does not provide specific details about how other factors influence PageRank. "